Drypoint Printmaking using a Cookie Container without a Press


This is a post from Belinda Del Pesco’s Art Blog Belinda Del Pesco.
While nibbling a cookie (Trader Joe’s Biscotti), I was pondering drypoint printmaking without a press. The container in my hand was sturdy and smooth, and I wondered if it could be used to make a drypoint plate. I also wondered how the cookie(s) I just ate could contribute to the printing without a press part of this conundrum….
Using a Cookie Container to Make a Drypoint Plate
You know those clear plastic containers you get some produce and baked goods in?
Some places call them clam-shells, since they often have a hinged cover. Here in the U.S., some distributors of lettuce, cookies, blueberries, and dried fruit use clear plastic boxes that can be recycled into printmaking plates.
With a little trimming, you can use parts of the containers as plates for drypoint or monotypes!
Make Some Printmaking Plates
First, eat the goodies in the container. 😌
Next, examine the top, bottom and sides for a smooth, flat section, free of seams, holes or ridges.
Note: the flattest segment may be under the product label.
Now, use kitchen shears or craft scissors to remove a square, rectangle, or circle of plastic.
Once the piece is free of the container, measure and straighten the edges with a utility knife and ruler.
If you’re cutting a round shape, trace the base of an appropriate sized canister with a marker, and carefully trim with a utility knife on a self healing mat.
Transparent Plate Material is Perfect for Tracing
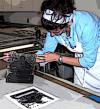
I’m using a twisted scribe – also known as a Whistler’s needle to draw a face in the plastic with firm pressure. If you don’t have access to a scribe, try an awl, an ice pick, or a heavy gage sewing needle, taped securely to a chop stick.
If drawing is challenging for you, take advantage of the clear plastic, and trace a photo. Tape it down, or make a trace outline of your plate on your reference photo so you can align it over your image again after pulling some test prints.
Fine Tune Your Cutting with Sand Paper
After I cut this little piece from the cookie container, and straightened it with a ruler, I used a fine grit sandpaper block to smooth the edges, and slightly round the corners.
Add Plenty of Crosshatching to Increase Contrast
Drypoint, like most printmaking, is an iterative process. That is, you can simply outline your form, and pull a print to see how it’s coming out. Then you can use that print to inform your next steps on the design.
Say you want to add shading, or contrast after seeing your outline print. You return to your cleaned and dried plate, and add lots of crosshatching.
After crosshatching shapes here and there, you ink and wipe the plate again, and pull another test print (these are called artist proofs).
At this stage, you decide a few details are needed to improve the composition of your design, so you scribe some more into the plate material. Then you ink, wipe and print again, and see how that looks, and so on.
Use Your Body Weight to Stomp a Print
The fun experiment with this print was stomp-printing it with nothing more than my body weight (which included the cookies I ate earlier). You can read more about Stomp Printing over here.
It’s important to avoid rocking the plate, paper, magazine sandwich, so your paper won’t move. That will lead to a staggered print.
Lay your assembly on the ground, and jump on it with two feet landing at the same time. That’s it. Don’t rock or take steps or twist. Step off the magazine, and check your print. How does it look?
The Right Tools for the Job
For the best chances at drypoint printmaking success, use intaglio printmaking ink, and printmaking paper to do this. Acrylic will dry too fast, and watercolor will bleed into the paper so you’ll lose your details.
If you have any other material-partnership workarounds that create a successful drypoint stomp print, please share them with us in the comments.
Have a ton of fun experimenting with this -
Thanks for stopping by, and I’ll see you in the next post!
Belinda
The post Drypoint Printmaking using a Cookie Container without a Press appeared first on Belinda Del Pesco’s Art Blog Belinda Del Pesco.
Source: https://www.belindadelpesco.com/drypoint-printmaking-using-a-cookie-container-without-a-press.html/
Anyone can join.
Anyone can contribute.
Anyone can become informed about their world.
"United We Stand" Click Here To Create Your Personal Citizen Journalist Account Today, Be Sure To Invite Your Friends.
Please Help Support BeforeitsNews by trying our Natural Health Products below!
Order by Phone at 888-809-8385 or online at https://mitocopper.com M - F 9am to 5pm EST
Order by Phone at 866-388-7003 or online at https://www.herbanomic.com M - F 9am to 5pm EST
Order by Phone at 866-388-7003 or online at https://www.herbanomics.com M - F 9am to 5pm EST
Humic & Fulvic Trace Minerals Complex - Nature's most important supplement! Vivid Dreams again!
HNEX HydroNano EXtracellular Water - Improve immune system health and reduce inflammation.
Ultimate Clinical Potency Curcumin - Natural pain relief, reduce inflammation and so much more.
MitoCopper - Bioavailable Copper destroys pathogens and gives you more energy. (See Blood Video)
Oxy Powder - Natural Colon Cleanser! Cleans out toxic buildup with oxygen!
Nascent Iodine - Promotes detoxification, mental focus and thyroid health.
Smart Meter Cover - Reduces Smart Meter radiation by 96%! (See Video).


| Online: | |
| Visits: | 1,602,227,698 |
| Stories: | 8,146,649 |
Whistler Blowers, Insiders
