How to Make a Drypoint Etching from Recycled Plastic, and Print it without a Press


This is a post from Belinda Del Pesco’s Art Blog Belinda Del Pesco.
Drypoint Etchings on Recycled Plastic Sheets
So far, I’ve experimented with Drypoint etching print from a Trader Joe’s biscotti container here, and a monotype print from a recycled plastic blueberry container here. In this post, we’ll go over a Drypoint from a plastic lettuce container, and we’ll keep the process super simple. We’ll print the Drypoint without a press, by using a cereal spoon.
Etching and Engraving Tools
Plastic printmaking plates are soft enough to engrave with a sewing needle taped to a chop stick. But if you have the means to get a twisted scribe (see them here on Amazon), I’d recommend adding one to your art supplies.
A stainless scribe will make engraving plastic (or traditional copper) plates much easier, and you’ll have it for the rest of your art-making life.
Recycled Plastic Produce Containers Make Great Drypoint Plates
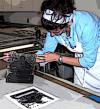
With a sharp tip held like a pencil, you can draw directly on a sheet of smooth recycled plastic to create a drypoint etching.
If drawing is not your jam, you can lay a photograph underneath your plate, and trace the shapes onto the plastic. (If you do this, it’s a good idea to tape both the photo and the plate to the table to keep the two sandwiched in place while you’re drawing.)
And if holding a scribe or an engraving needle for long periods of drawing time results in aches or pain, you can also use an electric engraver (like this one) to speed up the process.
If You Need a Reason to Buy Cookies
I hope you’ll try this drypoint etching process on a recycled cookie container. It’s fun, relatively quick, and you can print an entire edition at your kitchen table.Let me know in the comments if you’ve tried making one, and leave a link where we can see yours. Also, feel free to leave any questions about the process.
Thanks for stopping by and I’ll see you in the next post!
Belinda
P.S. Watch printmaker Karen Wicks pull two tiny drypoint etchings made from a medication packaging box.
Art Quote
Unsen Mountain is a woodblock print (ca 1927) by Hiroshi Yoshida. Yoshida was an avid traveler, outdoorsman, and hiker, and he captured the beauty of various scenes through these prints. He took inspiration from 19th-century European watercolorists and added Japanese traditional ink painting themes to depict the landscapes. This print (10 x 16) captures the Unsen Mountain from across a river. The low tide of the river exposes the surrounding sand and terrain. Many people are on the sand in their swimming suits and boats are portrayed in the center of the print. The size of the mountains contrasts the small size of the people and emphasizes human interaction with nature. Yoshida also uses this print to depict one of the pastimes of people.
The post How to Make a Drypoint Etching from Recycled Plastic, and Print it without a Press appeared first on Belinda Del Pesco’s Art Blog Belinda Del Pesco.
Source: https://www.belindadelpesco.com/how-to-make-a-drypoint-etching-from-recycled-plastic-and-print-it-without-a-press.html/
Anyone can join.
Anyone can contribute.
Anyone can become informed about their world.
"United We Stand" Click Here To Create Your Personal Citizen Journalist Account Today, Be Sure To Invite Your Friends.
Please Help Support BeforeitsNews by trying our Natural Health Products below!
Order by Phone at 888-809-8385 or online at https://mitocopper.com M - F 9am to 5pm EST
Order by Phone at 866-388-7003 or online at https://www.herbanomic.com M - F 9am to 5pm EST
Order by Phone at 866-388-7003 or online at https://www.herbanomics.com M - F 9am to 5pm EST
Humic & Fulvic Trace Minerals Complex - Nature's most important supplement! Vivid Dreams again!
HNEX HydroNano EXtracellular Water - Improve immune system health and reduce inflammation.
Ultimate Clinical Potency Curcumin - Natural pain relief, reduce inflammation and so much more.
MitoCopper - Bioavailable Copper destroys pathogens and gives you more energy. (See Blood Video)
Oxy Powder - Natural Colon Cleanser! Cleans out toxic buildup with oxygen!
Nascent Iodine - Promotes detoxification, mental focus and thyroid health.
Smart Meter Cover - Reduces Smart Meter radiation by 96%! (See Video).


| Online: | |
| Visits: | 1,602,303,379 |
| Stories: | 8,146,916 |
Whistler Blowers, Insiders
