How to Ink a Collagraph Print


This is a post from Belinda Del Pesco’s Art Blog Belinda Del Pesco.
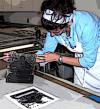
The Art of Wiping an Intaglio Plate
Inking and wiping an intaglio print is almost an art.
Watching a master printmaker ink and wipe an etching plate is similar to watching hands dance. The muscle memory of the printmaker’s hand movements is fluid and graceful, but deliberate. If you’re new to printmaking, it all looks a bit mysterious.
Think of plate wiping – whether it’s for an etching, a drypoint or a collagraph – as part of your design process. Especially if you’re printing with a single color. Inking and wiping controls the values – or the lights and darks – of your final print.
I’ve got a new tutorial video for you, demonstrating how powerful inking and wiping can be to a single color collagraph print. See below….
Strategic Wiping of Printmaking Plates
Watch this short video of master print maker Bich Rosalie Nguyen wiping a plate and applying chine colle to an etching. Beautiful, right?
Printmaker and Scholar, Andrew Raftery, is Associate Professor of Printmaking at Rhode Island School of Design. His demonstration of wiping a copper plate engraving in this video relays the careful particulars that go into plate wiping.
There are impactful options when you ink a Collagraph print too. I hope this collagraph plate inking post, and the accompanying tutorial video below will help make that clear.
Adjusting Values in a Collagraph with a Single Ink Color
This is a mat board collagraph of a whimsical landscape. (If you’re looking for details to make a print in this method, have a look at this video tutorial How to Make a Mat Board Collagraph.)
The collagraph plate can be inked in an intaglio style (printing from the recessed or engraved areas of the plate).
Or you can ink and print this plate relief style (printing from the uppermost shapes left in place after the cutting and peeling was completed).
Even more, you can print from both: ink and wipe so the recessed areas hold one color, and then top roll the relief areas in another color, etc.
You also have enormous potential in the way you ink and wipe a collagraph plate with a single color. Rather than letting the raised and recessed shapes dictate your lights and darks in the overall design, you can control them with a bit of wiping strategy.
Mixing Intaglio and Relief Inking on a Collagraph
Do you want to see a demo of printing this same collagraph plate with a variety of ink colors, as a full color print?
Would you be interested in seeing a tutorial of two colors – one in the intaglio parts of the plate, and the second color top rolled?
How about transforming the single color print – in paynes gray – to full color with the use of colored pencils? Would that interest you?
Leave a note in the comments below, to let me know what you’d like to see.
And if you haven’t already done so, be sure to subscribe to my YouTube Channel so you’ll get notified of new tutorials.
The Last 3%
One of my coworkers back in the day used to talk about the last 3% of a project. You know that point when you’ve been working on something for a time, and you want it to just be finished. Nearing the end, that last 3% tends to get rushed, or sloppy. And even though it’s only 3%, the rushed-elements show, and they can stain the whole project.
Wiping your printmaking plate is in that same category. You’ve planned the design, gathered the materials, built the plate, and now you’re printing an edition. You’re in the final stretch.
After all the investment of creative energy, now is not the time to get distracted, or rushed. The final result will be so much better if you finish strong.
Try to keep your focus, and intent for any art project fully engaged till the end.
Give your artistic endeavors every molecule of your attention.
Roll out your best problem solving, and research from artists ahead of you on the trail when you get stuck.
See it through. And know that I’m rooting for you.
Thanks for stopping by and I’ll see you in the next post!
Belinda
P.S. I mentioned in the video for this post that I can show you how to make ink daubers. Let me know in the comments of you’d find that useful, and I’ll put a quick video together.
Art Quote
If you can’t do it in black and white, all the color in the world is not going to help.
Robert Malone
Collagraph Printmaking Supplies
Reference photo (select something with simple lines and curves. Example: a coffee cup with a few stems of daisies would work well... but a cut-crystal vase of densely petaled roses might be a bit too much to carve.)Standard Framing Mat Board (also called mount board) https://amzn.to/2uvXutW Pen https://amzn.to/36l0xEO X-Acto knives: Standard Xacto knife https://amzn.to/3lfcJxo Retractable #9 (tiny) blade knife https://amzn.to/36et6Us Fiskars Swivel Tip Tiny Finger Knife https://amzn.to/358iK9q Fiskars Fingertip Craft Knife (uses standard #11 blades https://amzn.to/36gCwib Rubber Pencil Grip (these are very helpful if your hands are tender while gripping) https://amzn.to/3eFfQMD Liquitex Gloss Medium and Varnish to seal your mat board plate https://amzn.to/2IfcljG Paint Brushes to ink the plate https://amzn.to/2I8oXtq Rubber Gloves (always wear them while handling inks and modifiers) https://amzn.to/2IfORLy Akua Ink starter set https://amzn.to/3p9jUcK Akua Paynes Gray Intaglio Ink https://amzn.to/2U4yJyL Akua Graphite Intaglio Ink https://amzn.to/3kazmlg Akua MagMix (modifier to thicken the ink) https://amzn.to/3n5l07v Akua Transparent Base (this makes beautiful, transparent ink colors) https://amzn.to/35aNBSD storage jars for leftover ink https://amzn.to/2I8ncMQ BFK Rives paper Heavier Weight (for use with a press) https://amzn.to/2Ih3ONz BFK Rives paper (lightweight) for use with hand rub/transfer (*recommended if you plan to add other media*) https://amzn.to/2Cl75WI Kozo Mulberry paper (for hand rub/transfer, and no watercolor or wet media on the print, but works well if you want to add colored pencil) https://amzn.to/3pcEyZg Tarlatan cloth for wiping the plate https://amzn.to/38mDaxg Pointed Cotton Swabs https://amzn.to/3582ZiO Self Healing Cutting Mat https://amzn.to/3eBAv46 Colored Pencil (optional) https://amzn.to/3eBAzRo apron https://amzn.to/3eCcoCn Non-skid liner to secure your plate while inking & cutting https://amzn.to/3k7hQhL metal ruler with cork back for paper tearing http://amzn.to/1ATQx1f spatula for mixing/laying out ink https://amzn.to/3p7eE9r Mylar sheets (tape one down to mix ink on, if you don't have a piece of glass) https://amzn.to/358LU8g Takach etching press https://www.takachpress.com
The post How to Ink a Collagraph Print appeared first on Belinda Del Pesco’s Art Blog Belinda Del Pesco.
Source: https://www.belindadelpesco.com/how-to-ink-a-collagraph-print.html/
Anyone can join.
Anyone can contribute.
Anyone can become informed about their world.
"United We Stand" Click Here To Create Your Personal Citizen Journalist Account Today, Be Sure To Invite Your Friends.
Please Help Support BeforeitsNews by trying our Natural Health Products below!
Order by Phone at 888-809-8385 or online at https://mitocopper.com M - F 9am to 5pm EST
Order by Phone at 866-388-7003 or online at https://www.herbanomic.com M - F 9am to 5pm EST
Order by Phone at 866-388-7003 or online at https://www.herbanomics.com M - F 9am to 5pm EST
Humic & Fulvic Trace Minerals Complex - Nature's most important supplement! Vivid Dreams again!
HNEX HydroNano EXtracellular Water - Improve immune system health and reduce inflammation.
Ultimate Clinical Potency Curcumin - Natural pain relief, reduce inflammation and so much more.
MitoCopper - Bioavailable Copper destroys pathogens and gives you more energy. (See Blood Video)
Oxy Powder - Natural Colon Cleanser! Cleans out toxic buildup with oxygen!
Nascent Iodine - Promotes detoxification, mental focus and thyroid health.
Smart Meter Cover - Reduces Smart Meter radiation by 96%! (See Video).


| Online: | |
| Visits: | 1,602,178,112 |
| Stories: | 8,146,541 |
Whistler Blowers, Insiders
