Linocut Print and Drypoint Etching – Printmaking Mashup


This is a post from Belinda Del Pesco’s Art Blog Belinda Del Pesco.
Linocut Print and Drypoint Etching – Printmaking Mashup
In the last post – I dabbled with an experimental printmaking mash-up.
For that still life print, I carved a reduction Linocut for background color and engraved a Drypoint print on plexiglass for details and shading. (You can read that post here.) This new print is a smaller interior scene made with the same process.
Learning New Print Methods
Mixing relief and intaglio prints was a lot of fun, and since I learn best while doing, I started another one to test my theories about improving results.
Do you start similar printmaking projects as soon as you finish one, so your mistakes and lessons from the first print (or painting, or drawing) can be tested and improved on the second approach?
It’s best for me to strike while the iron is hot – in other words – immediately. If I wait too long before beginning a new print, all the ideas and solutions I learned from the previous print will cool and doze.
By the time I circle back around to that printmaking method, 8 months later, I have to start over again – from the beginning. And therein lies the trouble with sporadic, sometimes art-making.
By the Way… It’s time for a CYBER SALE in my Etsy Shop – till Dec 1st! 20% Off & Free Shipping!
Inexpensive Scribe for Drypoint Etching
I found this (below) very inexpensive scribe for drypoint engraving in plexiglass or acrylic on Amazon (see it here). It’s a General Tools Tungston Carbide Scribe, and it works great!
The point is needle-sharp, the textured grip keeps the tool steady in my hand, and it plows through acrylic material for layered crosshatching beautifully!
Working Small for Better Chances at Finishing
I’ve written 11 tips on the importance of making small art as a beginner artist in this post. And I’ll reiterate a snippet of that notion here… When art is process-intensive, like printmaking can be, working small helps beginners reach the finish line.
Finishing art leads to sharing it – and that can lead to compliments. Encouragement to keep making art by folks looking at our finished work helps us stay motivated to make more.
If the art never gets finished, no one ever sees it. That means we artists are solely responsible, without the benefit of outside nourishment, to keep our interest and motivation in making art alive and flourishing. That’s a daunting task. Work small, and finish.
Pulling a Cognate Print
If I carved an apple from a sheet of linoleum, and printed it with red ink on a sheet of paper, I could, while the print was still wet, press that apple print, ink-side down against a clean sheet of paper. If I applied pressure to the wet-print-against-clean-paper sandwich and pulled them apart, I’d have a cognate print.
Aiming for an approximate registration between my lino-block and my drypoint plate makes use of a cognate print.
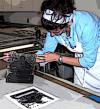
The drypoint on plexiglass is created first. It holds the key to all the shapes, shadows, and details. After inking and wiping the drypoint plate, I printed it on my press, on BFK Rives paper.
As soon as I pulled the drypoint print, I laid a sanded and prepared sheet of unmounted linoleum face down on the still-wet ink. Then I ran this new sandwich through the press, to transfer the drypoint, line for line, onto the face of the linoleum (see below).
Linocut Cognate Print Fail
My drypoint engraving to linocut plate cognate print failed. I suspect the paper getting stuck to the linoleum and tearing as I pulled it was a result of old supplies. Both my linoleum and the paper are over a decade old.
Despite the tear, I left the lino block out in my studio to air dry the ink for a few days. When tapping the ink with a finger showed clean prints, I lightly spritzed the stuck paper with a cool, clean water atomizer, and let it sit for a minute. Using the pads of my fingertips, I gently rolled the torn paper from the linoleum plate, and it came right up, leaving the ink underneath.
Pulling the First Color Ink on a Reduction Linocut
Selective Inking on a Linocut Block
Even on a tiny linocut, you can use small rollers, or light brushes to apply selective color to the block.
On this linocut block, I carved away the window and a few highlights on perfume bottles. Then I inked the block with transparent aqua blue everywhere except the chair.
Next, I used a small brayer to ink the chair in yellow, and another brayer to add yellow on top of the blue to make green on the walls above the chair head.
Drypoint Etching on Top of a Color Linocut
The print edition for this linocut and drypoint mash-up is 7, and the first print in the edition is listed in my Etsy Shop here.
The process has been so interesting, so I have several new linocut and drypoint prints in various states of becoming. Still Life and Figurative drypoints are in the works, to get printed as cognates onto the linoleum.
Have you ever mixed these two printmaking methods? Leave us details in the comments, or a link to a post you know of.
We’ll never have enough time to convey all the ideas we get from each other into art, but we’ll do our darndest to squeeze every last hour from a day so we can get ink under our nails, paint up our sleeves, or graphite on our fingertips.
Thanks for stopping by, and I’ll see you in the next post -
Belinda
Label Your Printmaking Paper
My plexiglass plate for this tiny interior was the dictator of size. A few years ago, I helped a friend sort and empty her late father’s art studio, and she gave me a box of plexiglass plates that all measure 5.75 x 5 inches. We couldn’t decipher what the original plan was for the plates, but I thought I’d use them to make Drypoints.
The post Linocut Print and Drypoint Etching – Printmaking Mashup appeared first on Belinda Del Pesco’s Art Blog Belinda Del Pesco.
Source: https://www.belindadelpesco.com/linocut-drypoint-etching-mashup.html/
Anyone can join.
Anyone can contribute.
Anyone can become informed about their world.
"United We Stand" Click Here To Create Your Personal Citizen Journalist Account Today, Be Sure To Invite Your Friends.
Please Help Support BeforeitsNews by trying our Natural Health Products below!
Order by Phone at 888-809-8385 or online at https://mitocopper.com M - F 9am to 5pm EST
Order by Phone at 866-388-7003 or online at https://www.herbanomic.com M - F 9am to 5pm EST
Order by Phone at 866-388-7003 or online at https://www.herbanomics.com M - F 9am to 5pm EST
Humic & Fulvic Trace Minerals Complex - Nature's most important supplement! Vivid Dreams again!
HNEX HydroNano EXtracellular Water - Improve immune system health and reduce inflammation.
Ultimate Clinical Potency Curcumin - Natural pain relief, reduce inflammation and so much more.
MitoCopper - Bioavailable Copper destroys pathogens and gives you more energy. (See Blood Video)
Oxy Powder - Natural Colon Cleanser! Cleans out toxic buildup with oxygen!
Nascent Iodine - Promotes detoxification, mental focus and thyroid health.
Smart Meter Cover - Reduces Smart Meter radiation by 96%! (See Video).


| Online: | |
| Visits: | 1,602,267,067 |
| Stories: | 8,146,827 |
Whistler Blowers, Insiders
