Drypoint Printing at Home without a Press (Part 2)


This is a post from Belinda Del Pesco’s Art Blog Belinda Del Pesco.
To Crosshatch or Not – on a Hand-Printed Drypoint
In the previous post, lots of cross hatching was scribed into a small sheet of plastic from a produce container. That Drypoint was inked, wiped and hand printed with a baren, and via the stomp print method.
The results, even after a flock of adjustments, were not very satisfying. Hand rubbing damp printmaking paper on a tiny plate with a thousand inked lines incised in the surface is a challenge. The resulting print was too light, and details were blurred or lost.
But as you know, we learn more from failing than we do with quick success. So we stay with it, and keep trying new things. Right?
If at First You Don’t Succeed…
This printmaking example is meant to encourage you to make a Drypoint from recycled plastic, at home, without a press. I dearly want you to give it a try, but I also want to encourage you to build your design with simple lines.
Think of your drypoint print like a frame from a comic strip, or a vintage book illustration. Dark, lean lines around areas that are open for color afterwards. Avoid cross hatching details or shading your image.
To make my point visual, I’ve got a duplicate plate in this post, from the same produce container as the last post. It’s the same size, and drawn from the same reference photo.
Try and Try Again
After multiple failed attempts to transfer the previous, shaded version of this Drypoint portrait, the very first print transferred quickly, without any trouble.
I think part of what will make this easier when you make one, is that the line work can be felt through the paper with the spoon.
When the whole plate is covered with textures, your spoon has to press evenly over the entire surface to get a complete transfer. With the line version, you can feel your way to the important parts, and drive your spoon directly over each line, like you’re tracing the image.
Success After Failure Keeps You in the Game
I transferred this print more successfully, with less movement of the damp paper, in half the time it took to rub the shaded version of the Drypoint. I think this is the best approach to try as a beginner attempting to hand transfer a Drypoint print.
If you’re an experienced printmaker reading this, please weigh in, and leave a comment on your experience with hand transfer of intaglio style printmaking. Every tip and trick will help other folks aiming for success with this fabulous, drawn-line style of printmaking.
Hand Coloring your Drypoint
Let your paper and ink dry completely before you start adding other media. I live in a damp, coastal environment, but my little drypoint was dry the next day.
The speed of drying will be affected by your choice of ink and paper, as well as the atmosphere of your environment. If you plan to use Akua intaglio or Caligo Safewash etching inks, remember that they dry via absorption. Paper manufactured with external and internal sizing (card stock, watercolor paper, etc.) will prohibit the ink from sinking into the pulp quickly, so be prepared to wait awhile till it dries.
If you need a bit of inspiration before laying color on your drypoint edition, see the illustration of Jessie Willcox Smith, modern comic strip art, or graphic novel art.
The Drypoint from the Previous Post, on the Press
After my failed attempts to print the cross hatched and shaded version of this drypoint by hand (see the previous post on that), I tried printing it on my press.
The plastic from the produce container is very thin, so I cut a matching piece of mat board to slide under the plate. This acts like a shim, and raises the surface of the plate just a smidge above the press bed. This way, the cylinder doesn’t have to be cranked down so tightly, causing all the pressure to be distributed across the bed itself.
Even with one pass of enormous pressure on the etching press, the drypoint didn’t print with lights and darks where I wanted them. Part of the issue, I believe, is that I needed to add more cross hatching on the hair and face. That is the beauty of an artist’s proof. You wouldn’t know what needs more ink-holding textures till you run a proof through the press.
Know Your Art Supplies by Testing Them
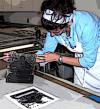
I didn’t continue scribing the drypoint figure, but I did print her on three different papers (see above).
They were all on soaked and blotted paper – Speedball, Zerkall and BFK Rives – just to see the difference in the transfer of tones and values. I used the same ink on each print – Cranfield Caligo Safewash etching ink in Blue Black ( It’s one of my favorite drypoint inks.
If you decide to test the various papers in your arsenal, it’s a good idea to mark the brand and weight on the verso of each sheet in pencil on a corner. You can abbreviate, as long as you understand your own code. ![]()
In the photo of this print above, laying next to the plate and the spoon, you can see a tiny pencil inscription on the lower right corner: BFK. That’s BFK Rives paper.
If I didn’t mark my printmaking paper, Drawing paper and Watercolor paper after it’s torn or cut down to size, I’d have no idea what I was working on. They get all mixed up in piles and folders and on the shelves in my studio. So do yourself a favor, and mark all of your papers.
And be sure to make a drypoint soon. ![]()
Thanks for stopping by today, and I’ll see you in the next post!
Belinda
P.S. Don’t forget to peruse my Etsy Shop if you’ve got watercolor or printmaking on your gift list. 20% off everything, framed and unframed, with free domestic shipping till Wednesday, Dec 2.
Art Quote
It was not until the 1500s that books originally in Japanese began to be printed [via woodblock prints]. Black and white illustrations were a part of these early texts, to which color was added by hand. Eventually, colored prints developed around 1765 as printing techniques improved. The first colored prints in Japan were original works of art, which soon led to the publishing of the popular, single-sheet ukiyo-e.
The Evolution of Ukiyo-e and Woodblock Prints, The Khan Academy
The post Drypoint Printing at Home without a Press (Part 2) appeared first on Belinda Del Pesco’s Art Blog Belinda Del Pesco.
Source: https://www.belindadelpesco.com/drypoint-printing-at-home-without-a-press-part-2.html/
Anyone can join.
Anyone can contribute.
Anyone can become informed about their world.
"United We Stand" Click Here To Create Your Personal Citizen Journalist Account Today, Be Sure To Invite Your Friends.
Before It’s News® is a community of individuals who report on what’s going on around them, from all around the world. Anyone can join. Anyone can contribute. Anyone can become informed about their world. "United We Stand" Click Here To Create Your Personal Citizen Journalist Account Today, Be Sure To Invite Your Friends.
LION'S MANE PRODUCT
Try Our Lion’s Mane WHOLE MIND Nootropic Blend 60 Capsules
Mushrooms are having a moment. One fabulous fungus in particular, lion’s mane, may help improve memory, depression and anxiety symptoms. They are also an excellent source of nutrients that show promise as a therapy for dementia, and other neurodegenerative diseases. If you’re living with anxiety or depression, you may be curious about all the therapy options out there — including the natural ones.Our Lion’s Mane WHOLE MIND Nootropic Blend has been formulated to utilize the potency of Lion’s mane but also include the benefits of four other Highly Beneficial Mushrooms. Synergistically, they work together to Build your health through improving cognitive function and immunity regardless of your age. Our Nootropic not only improves your Cognitive Function and Activates your Immune System, but it benefits growth of Essential Gut Flora, further enhancing your Vitality.

Our Formula includes: Lion’s Mane Mushrooms which Increase Brain Power through nerve growth, lessen anxiety, reduce depression, and improve concentration. Its an excellent adaptogen, promotes sleep and improves immunity. Shiitake Mushrooms which Fight cancer cells and infectious disease, boost the immune system, promotes brain function, and serves as a source of B vitamins. Maitake Mushrooms which regulate blood sugar levels of diabetics, reduce hypertension and boosts the immune system. Reishi Mushrooms which Fight inflammation, liver disease, fatigue, tumor growth and cancer. They Improve skin disorders and soothes digestive problems, stomach ulcers and leaky gut syndrome. Chaga Mushrooms which have anti-aging effects, boost immune function, improve stamina and athletic performance, even act as a natural aphrodisiac, fighting diabetes and improving liver function. Try Our Lion’s Mane WHOLE MIND Nootropic Blend 60 Capsules Today. Be 100% Satisfied or Receive a Full Money Back Guarantee. Order Yours Today by Following This Link.


| Visits: | 1,707,530,488 |
| Stories: | 8,447,978 |
Whistler Blowers, Insiders
