
How To Grow Your Own Oyster Mushrooms On Straw

HOW TO GROW YOUR OWN OYSTER MUSHROOMS ON STRAW
by Dr Samuel Alexander, co-director of the Simplicity Institute and a lecturer with the Office for Environmental Programs, University of Melbourne.
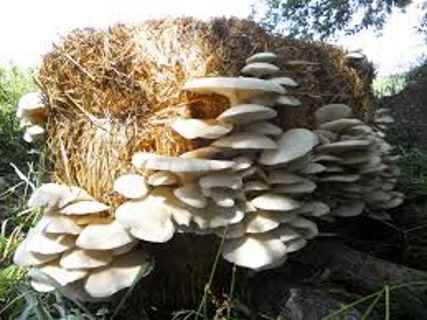
 I’ve been experimenting recently with growing my own oyster mushrooms, and as you can see from the photos, I’ve met with some success. I was motivated to explore mushroom cultivation partly because I’m a vegetarian and want to produce my own high-protein alternatives to meat; but I was also interested in using so-called ‘dead space’ to grow food (either inside or down the shady side of the house). Oyster mushrooms tick both these boxes, and they are also ridiculously tasty. Seriously.
Not only that, oyster mushrooms are extremely expensive when purchased from a supermarket, so it makes sense to grow them yourself. Currently in Melbourne they are going for $34 per kilo.
I’m no mushroom-growing expert, so do your own research, but below I’ve outlined how I’ve successfully grown my own oyster mushrooms on straw. It’s surprisingly easy, although you do need to take appropriate precautions to make sure you are growing the right mushrooms and in a hygienically safe way. Apparently white oyster mushrooms are the easiest variety to grow, which is why I started with them.
And do it the old fashion way, like our fore-fathers did it and succeed long before us, because what lies ahead of us will require all the help we can get. Watch this video and learn the 3 skills that ensured our ancestors survival in hard times of famine and war.
What you need:
- Straw (I used pea-straw successfully but I’m told wheat straw is better)
- Robust plastic bags, medium or large size (which can be reused)
- Oyster mushroom spawn (which I got from CERES in Melbourne and are also availablehere). You may need to find your local supplier.
- Spray bottle and water
 My 10-Step Method:
- Before you begin, wash your hands and clean all your surfaces well. It’s very important to be hygienic when cultivating mushrooms, as you do not want to grow the wrong types of fungi! Good mushrooms are really good; bad mushrooms are really bad. Fortunately, oysters mushrooms are very distinctive.
- Once you’ve got all the materials, the first thing you need to do is pasteurise the straw. From my research online, I discovered that this essentially means heating the straw in water to around 70-75 degrees (Celsius) and holding it at that temperature for around 45-60 minutes. I used a large Fowlers cooking pot. Pasteurisation kills the bad bacteria but leaves the good bacteria. Before you put the straw in the pot, most websites recommend that the straw is cut up into small pieces, around 1 to 3 inches in length. (To be honest, I didn’t cut up my straw, and I still grew mushrooms, but perhaps if I had cut it up my production might have been greater — further experimenting required.)
- Once you’ve pasteurised the straw, take it out of the heating pot with tongs and let it sit in a clean tub while it cools down. Be careful as you’re dealing with a lot of hot water and the pot will be heavy. It’s important you don’t put the mushroom spawn into the straw until the straw is at room temperature otherwise you will kill the spawn.
- When the straw has cooled down, pack your robust plastic bags with straw quite tightly, and then distribute some of the mushroom spawn throughout the straw. I put about three or four pieces of spawn-covered dowel in each bag, but perhaps one would have been fine (further experimenting required). The straw should not be dripping wet, but it should still be damp from the pasteurisation.
- At this stage, sterilise a skewer or a nail (by pouring boiling water over it) and jab holes in the bags every 3 inches or so. This lets some air in, but not too much.
- You now have to find a home for you mushrooms. Keep them out of direct sunlight. They like some indirect light and I am told they like it best at around 15-20 degrees Celsius. (It’s been considerably warmer than that in Melbourne over the last two months, and mine have grown very well, but again perhaps the yields would have been greater had the temperature been cooler). More experimenting required. I kept my bags inside to minimise the risk of contamination.
- Now you wait while the mushroom spawn develops into mycelium and begins taking over the entire bag. Mycelium looks a bit like white furry cobwebs, and you should start seeing it develop in the first couple of weeks. It’s important that your bags of straw stay moist, but not dripping wet. I found that the water from the pasteurisation was sufficient to keep the straw suitably moist without needing to spray with water.
- After a number of weeks (depending on the size of your bags) the mycelium should have spread across the entire bag of straw. It is at this stage (which for me was about 5 weeks later) your mushrooms should start forming. I cut some slightly larger holes in the bag, although I’m not sure this was necessary. The mushrooms will decide that they want to grow out of one or more of the holes you’ve created, and they’ll usually grow in one or two clusters.
- Now comes the fun part. The mushrooms essentially double in size every day, so within a week or so you should have good-sized oyster mushrooms. Mist them with water two or three times a day over this period – again, not so they are dripping, just so they are moist. The mushrooms should be harvested while their rims are still curled over a little and pointing downwards. If their rims seem to be turning upward, it’s probably time to harvest.
- Harvest and eat. To harvest the mushrooms give them a twist at the base. This ensures that you leave the very bottom of the mushroom still in the bag. You want to leave that part behind as it is needed for the subsequent flushes of mushrooms. If you keep the mushrooms moist and in suitable conditions, you should get three or four flushes of mushrooms, although I’m told the first and
 second flushes are the most productive. I’m currently harvesting my second flush. When your bags stop producing, the straw can be used as mulch for the garden. (Alternatively, my understanding is that you can distribute some of your straw into new bags of fresh straw and the growing process begins again).
If there are any mushroom experts out there, do let me know if you have any advice, and if any of you decide to begin cultivating your own mushrooms, do let me know how you get on. I’m going to keep experimenting in the hope of developing the easiest and most productive methods.(source)
How to Grow Massive Oyster Mushrooms in Your Straw Garden, Part 1
The elm oyster mushroom loves to grow on straw. This video is a short tutorial how to grow elm oyster mushrooms in your own garden. When the mycelium is mixed into the straw and used as mulch for your garden, multiple benefits occur….the straw is rapidly broken down to feed the plants, water is retained and, of course, edible, gourmet mushrooms are produced along side your vegetables.
RELATED : The Best Way to Grow Sweet Potato in Straw Bales, Bags and Containers
How to Grow Massive Oyster Mushrooms in Your Straw Garden, Part 2, 3 Months Later
90 days after inoculation with a spent 100th Monkey Mushrooms Elm Oyster mushroom kit, this straw mulch bed has already produced 15 pounds of edible, gourmet, medicinal mushrooms!
Don’t wait until food becomes scarce; start preparing for the future now by becoming as self-reliant as possible. Your long-term chances of survival could very well depend on your ability to feed yourself and your family without relying on someone else.
Books can be your best pre-collapse investment.
Carnivore’s Bible (is a wellknown meat processor providing custom meat processing services locally andacross the state of Montana and more. Whether your needs are for domestic meator wild game meat processing)
The Lost Book of Remedies PDF ( contains a series of medicinal andherbal recipes to make home made remedies from medicinal plants and herbs.Chromic diseases and maladies can be overcome by taking the remediesoutlined in this book. The writer claims that his grandfather was taughtherbalism and healing whilst in active service during world war twoand that he has treated many soldiers with his home made cures. )
Easy Cellar(Info about building and managing your root cellar, plus printable plans. The book on building and using root cellars – The Complete Root Cellar Book.)
The Lost Ways (Learn the long forgotten secrets that helped our forefathers survive famines,wars,economic crisis and anything else life threw at them)
LOST WAYS 2 ( Wordof the day: Prepare! And do it the old fashion way, like our fore-fathers did it and succeed longbefore us,because what lies ahead of us will require all the help we can get. Watch this video and learn the 3 skills that ensured our ancestors survival in hard times offamine and war.)
SOURCE : https://www.prepperfortress.com/grow-oyster-mushrooms-straw/
Anyone can join.
Anyone can contribute.
Anyone can become informed about their world.
"United We Stand" Click Here To Create Your Personal Citizen Journalist Account Today, Be Sure To Invite Your Friends.
Humic & Fulvic Liquid Trace Mineral Complex
HerbAnomic’s Humic and Fulvic Liquid Trace Mineral Complex is a revolutionary New Humic and Fulvic Acid Complex designed to support your body at the cellular level. Our product has been thoroughly tested by an ISO/IEC Certified Lab for toxins and Heavy metals as well as for trace mineral content. We KNOW we have NO lead, arsenic, mercury, aluminum etc. in our Formula. This Humic & Fulvic Liquid Trace Mineral complex has high trace levels of naturally occurring Humic and Fulvic Acids as well as high trace levels of Zinc, Iron, Magnesium, Molybdenum, Potassium and more. There is a wide range of up to 70 trace minerals which occur naturally in our Complex at varying levels. We Choose to list the 8 substances which occur in higher trace levels on our supplement panel. We don’t claim a high number of minerals as other Humic and Fulvic Supplements do and leave you to guess which elements you’ll be getting. Order Your Humic Fulvic for Your Family by Clicking on this Link , or the Banner Below.

Our Formula is an exceptional value compared to other Humic Fulvic Minerals because...
It’s OXYGENATED
It Always Tests at 9.5+ pH
Preservative and Chemical Free
Allergen Free
Comes From a Pure, Unpolluted, Organic Source
Is an Excellent Source for Trace Minerals
Is From Whole, Prehisoric Plant Based Origin Material With Ionic Minerals and Constituents
Highly Conductive/Full of Extra Electrons
Is a Full Spectrum Complex
Our Humic and Fulvic Liquid Trace Mineral Complex has Minerals, Amino Acids, Poly Electrolytes, Phytochemicals, Polyphenols, Bioflavonoids and Trace Vitamins included with the Humic and Fulvic Acid. Our Source material is high in these constituents, where other manufacturers use inferior materials.
Try Our Humic and Fulvic Liquid Trace Mineral Complex today. Order Yours Today by Following This Link.


| Online: | |
| Visits: | 1,615,041,384 |
| Stories: | 8,184,771 |
Whistler Blowers, Insiders
